Friday, July 27, 2012

Daffodils...Completed!

      I confess, I'm a bit of an overachiever.  During a recent 2-day stained glass class at Glass Axis, a very cool non-profit glass studio in Columbus Ohio, I met once again with my defining character trait.
Our teacher: Samantha Hookway.
Check out her website! www.samanthahookway.com
      The teacher of my class, Samantha, keeping our 12 hour time frame in mind, suggested creating a stained glass composition comprised of 30 or so pieces.  MY piece ended up containing nearly 75 pieces!  I knew this could present a problem when it came to finishing the project within the class's time frame.  But I tried anyway, and ended up getting it mostly done before I had to return home.  Visit here to read about the first day of class, and here for the second day of class.
When I left Glass Axis, this is what my project looked like.
      "Stained glass" consists of many phases each piece of glass must pass through prior to completion.  During my time at Glass Axis, I designed a pattern, cut the glass pieces, smoothed them by grinding, copper foiled each piece, and finally, soldered all pieces together on the front side.  


Finishing work continues at home.
      When I arrived home, my project still had a few steps to go before being complete.  My first course of action was to solder the back side. Then I had to create a frame using wide, "U" shaped zinc "came".  Came refers to the metal used to surround a piece or composition of stained glass. The U refers to the metal's shape.  U shaped came allows the glass to slide in one side and be held securely, as a frame. 
U shaped came (shown on it's side, so C shaped came?)
The edge of the glass goes into the open side. The closed side is smooth and tidy,
creating a nice finished edge for the frame.


      I brought a piece of this with me from Ohio, and after leaving it behind in the rental car for a few days, was finally able to construct and complete the frame. 
Attaching loops for hanging.  Now if only I had a place to hang it!
      Next, I had to create a way to hang the panel.  I created these loops by twisting copper wires together and bending them into ovals.  I did this to make the loops strong enough to hold this 9" x 16" glass construction.  The last thing I want is for my hard work to come crashing down out of the window because the hangers are too weak!
Yeah!! Finally finished!  I am super pleased with how my daffodils have turned out!
        Only one more step...and I forgot to take a photograph, sorry.  You will notice that the lead solder areas that used to be silver in my panel are now black.  The final phase in my piece was oxidization. I brushed a liquid chemical all over the front, back, and sides of my piece which created an instant black patina.  In the "olden days," stained glass artists would have to wait for the patina to occur naturally from the effects of weather and time.  I'm not that patient.  By the way, oxidization is completely optional.  I could very easily have left the lead silvery.  However, I felt the black would dramatically set off the light and bright yellows and blues in the design.  
All lit-up in the window, I love it!
         After adding a chain, I am finally completely, totally, 100% DONE! Hooray!  I feel like I have made a major accomplishment!  And once I hung my creation in the window, I was struck by how the effects of light change the visual aspect of the design.  The colors become so vivid and dynamic, the black lines are so fluid and crisp. My heart swells with satisfaction!  This whole process is just a tiny, tiny bit of what I have yet to do to complete my Lilly Teacher Creativity fellowship.  But now the pump has been primed!  

Glass Axis Day #2

http://glassaxis.org/
      Today's the day I finish (hopefully!) the nature inspired stained glass composition I began yesterday on day #1 of my 2-day advanced stained glass class at Glass Axis in Columbus, Ohio.  Read about how my project started off here.
The results of yesterday's grueling glass cutting madness.
I'm relieved to see that the buckets of sweat I dripped yesterday have dried up by now.
     The weather report promises another hot one. So with fans turned on high and bottled water within arms reach, we pick up where we left off yesterday.  I actually got permission to come in an hour or so early today because those 75 pieces of glass are causing me great deadline angst!  I'm 3 hours from home and I don't think my dozens of glass bits tacked limply together will survive the trip in any condition to be finished later. I've got some serious work to accomplish today!
Each and every piece of glass must have it's edges smoothed by a glass grinder.  
     The first thing on my agenda is to grind each piece of glass.  Using a glass grinder (think wood sander-but for glass), I smooth the edges of every piece.  Pieces that may not have been cut in exactly the right shape can have their shapes corrected during this phase.  As each piece is ground, they are placed back onto the pattern to ensure everything is fitting together.  A good fit is imperative!
"Foiled again!"  I crack myself up.
      After all 75-ish pieces have been through the grinder, next comes the copper foiling step.  Each piece of glass is wrapped all the way around with a narrow strip of adhesive copper foil.  The glass is centered on the foil strip, wrapped, then the edges are folded over and burnished flat for a secure adhesion. This method of applying copper to each piece of glass, then soldering everything together was established by the infamous stained glass designer Louis Comfort Tiffany over 100 years ago. It is very popular because it allows artists to show great detail in their glass designs. 
Everyone is wrapped and ready!
      Once the copper foil has been added to all pieces, the composition is secured with nails to keep it from moving. It is now time to solder all the pieces together, making them permanent. Soldering flux is brushed onto all the copper areas, and the fun begins!
Tools of the trade: soldering iron, 60/40 solid core solder, fume extractor
      I begin by tacking all the pieces together with a little blob of solder, then begin the aesthetic soldering on the front side.  The goal is to create smooth lines of rounded, not flat, lead.  Notice the square fume extractor box in the photo...proper ventilation is mandatory when working with lead.  Precautions of many kinds are taken when I solder: open doors, fans moving air, my fume extractor, rubber gloves, and at times I will even wear a face mask. And of course, lots of hand washing!  Most cases of lead poisoning are triggered by the ingestion of lead (eating or drinking after handling lead), or the inhalation of lead fumes (created by soldering) or dust. Scary stuff!  


My classmate tack-soldering her creation.
She's using lead-free solder.  It is healthier but much more expensive,
and a bit harder to use since it doesn't flow as smoothly as lead.  
      After eight hours of glass grinding, copper foiling, and soldering, the end of our class time is drawing near. As I have a 3 hour drive home to contend with, I've come to terms with the fact that I will not be able to finish my project completely at Glass Axis.  However, I was able to get the front side completely soldered, and that will make the piece secure enough to transport.  
Front side soldering complete!
      When I get home to my own workspace, I will be able to solder the back and add the finishing touches to my largest, and finest, stained glass creation in 15 years!  See you at my place...

Thursday, July 26, 2012

Glass Axis Day #1

      Recently, I had the opportunity to take a two day class at Glass Axis in Columbus, Ohio. Glass Axis is a not-for-profit glass art studio and gallery.  Within their facility they have a hot glass studio equipped for glass blowing, molten glass manipulation, and annealing.  I spent my time in Glass Axis's cold glass studio, where a great teacher helped me remember how to design and create a large (compared to what I'm used to), structured stained glass composition.
http://glassaxis.org/
"Glass Axis is a 10,000 sq. ft. art center providing artists, students, and community members
  the tools necessary to passionately create innovative works in glass while learning, sharing,
and teaching. Member artists have access to affordable glass blowing, glass fusing, torch
working, cold working, stained glass and neon facilities, plus studio, exhibition, education,
outreach, and income-producing opportunities all under one roof."
http://glassaxis.org/classes
Glass Axis offers classes in all things glass related, from stained glass and
mosaic to glass blowing and fusing.
 

     Glass Axis is housed in a neat old factory with lots of tall glass windows, and inlaid stone floors.  One thing it lacks, however, is air conditioning.  Of course, the weekend I attended my class it was over 100 degrees...outside. Our class area was right beside the hot shop's 2 molten glass furnaces, making for a very, very hot and sweaty day.  I loved it!  I love the heat and working up a good sweat, but I did not envy the group of ladies there for the glass blowing class!
My workspace was right next to these blown glass bowls created by one of the studio's resident artists.  I found them very beautiful and inspiring as I tried to avoid knocking them off the table all weekend.
      The first thing we did during class was come up with a design to create in stained glass.  Our teacher told us to shoot for a composition that would contain about 30 pieces of glass.  Working with stained glass involves many phases, and she felt 30 pieces would guarantee us a finished piece by the end of class the next day.  Okay, 30 pieces, no problem. 
My design was inspired by these daffodils we found at
Wildwood Nature Preserve in Kosciusko County.  
      So, I am the world's slooowweesst decision maker, and one of the world's slowest drawers.  I knew I wanted to create a piece inspired by my nature preserve hiking adventures, so I got out my computer, looked over the photos...and discovered the root of my decision making issues--too many choices!

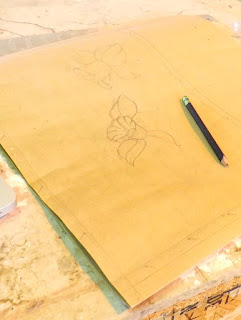
The beginning of my hiking-inspired design.


      Finally, after 3 hours of debating and deliberating on which of the hiking photos I wanted to use as inspiration for my piece, then drawing, erasing, redrawing, and re-erasing, and finally getting it down on paper, I had it!  And I liked it, too.  


The final design for my stained glass creation.
Perhaps you've already picked up on the fact that there are waaaaay more than
30 pieces of glass in this design.
      The only problem...this design has nearly 75 pieces!  Okay, not really a problem for me. The teacher has confidence in my past experience enough to allow me to proceed.  Actually, I think she's afraid of the several more hours it would no doubt take me to re-design it.  So I begin!


Glass Axis provided all the glass and tools needed for our class.
They had a nice array of colors and styles to choose from.
 
      I began by selecting the glass to use in my design. The thing that has always drawn me to the art of stained glass more than anything else is the visual aspect of the colors.  I am easily awed by the interplay of light and color, and there is nothing more breathtaking to me than to see colors actually light up - which is the whole point of stained glass.
My pattern for creating correctly shaped glass pieces
      Next, I photocopied my drawn design and used it as a pattern for my individual glass pieces.  Each pattern piece was placed on the glass, traced with Sharpie, then cut using special glass cutting and shaping tools.  Eventually, my paper design began to be filled in with glass pieces.
I chose to work with all the same colored areas at one time, to ensure I didn't lose track
of my design and run out of my chosen colors.
Those long, skinny, curving pieces of glass are t r i c k y to cut without snapping in half.
I'm pretty sure I held my breath the whole time.
Finally finished!  For today.
      By the time I have traced and cut out all 75-ish pieces of this design, I am ready to collapse of heat exhaustion.  It has been 8 and a half standing-up hours of hot and sweaty, but satisfying and creative work.  I am stoked to return and put it all together tomorrow.  After a taaaallll glass of water, and a shower. Or two.

Monday, July 16, 2012

Maumee River Overlook, Allen County


http://www.acreslandtrust.org/templates/System/details.asp?id=44551&PID=635632
      On a very hot day, when everyone had finally achieved exhaustion from a week full of 4-H fair duties, competitions, and of course, midway rides, I planned a preserve hike. I picked the Maumee River Overlook Nature Preserve for two reasons: 1) it is very far away, necessitating a long, relaxing drive in a frosty-cool air-conditioned car, and 2) I knew it was a very, VERY small preserve and would require hardly any hiking. 

Hank and Evelynn racing to the end of the trail.  
     We were not to be disappointed. This preserve in a single acre of land, with about 1/10th of a mile of trails...er, trail. Evelynn and Hank walked quickly to the end, turned around, and announced that it was time to go to the nearest McDonald's.  
Overlooking the Maumee River...I think?
      When the land was given to ACRES in 1976 as a gift, it offered a panoramic view of the Maumee River. Visitors looking east could even see the riffling waters of Bull Rapids, the site of a water powered sawmill in the 1870's. This sawmill provided lumber used to construct the Wabash-Erie canal, which was located along the southern border of the preserve. 
  
A spy's view of the opposite river bank.
      However, the view from atop the steep bluff today is quite obscured by trees, foliage, and typical woodland undergrowth. We were a little disappointed that we could not actually over look the Maumee River.  
The zoom on my camera caught a few peeks of the illusive river view.
      We caught occasional glimpses of the flowing river waters through tiny windows in the foliage, and were seriously tempted to go off-trail hiking down the steep incline to the water's edge.  But our flip-flops and exhaustion from the prior week's activities got the better of us, and we opted for a family discussion about how forests grow and evolve over time, and how it is actually a good, healthy sign that we can no longer see the river from this trail.  
      Not allowed a river view, we focused on the things we could see around us, and discovered these...


Ohio Buckeyes.
Inside these bumpy hulls are the nuts of the buckeye tree.  In September the hulls will
become ripe, split open, and drop their shiny brown nuts to the ground.  The name "Buckeye"
 came from the Native Americans who noticed that the glossy brown seeds with the lighter
circular "eye" looked very similar to the eye of a buck deer.  

Many consider buckeye nuts to be good luck charms.
And if you suffer from rheumatism or arthritis pain, carrying a buckeye in
your pocket is said to bring relief.  
An omen of an early autumn? Or just evidence of a really dry summer?
Hot, dry weather will speed up the rate at which pine cones open up and release their seeds.  
Basswood.
 Leaves turning yellow like these are a sign that the tree is not getting enough water.  
      After hiking a full 2/10th's of a mile into and back out of the preserve and taking a few interesting snapshots, it was time to head home again.  Today we were thankful for a quick and easy hike, and a functioning a/c!  See you next time.


Thursday, July 5, 2012

The Bicentennial Woods, Allen County

      After hiking the last two nature preserves with my adoring husband, Sherman, and his faithful companion, Cell Phone, I decided to once again hike alone.  
http://www.acreslandtrust.org/templates/System/details.asp?id=44551&PID=630179
      This solo venture brings me to The Bicentennial Woods, a hilly 80 acre preserve in northern Allen county. The property was acquired to honor Fort Wayne's Bicentennial in 1994. 
Willow Creek, a tributary of Cedar Creek
      As Fort Wayne approached its 200th anniversary, ACRES began looking for an appropriate property to commemorate the historic event.  
A small stream leading to Willow Creek
      The Bicentennial Woods location was selected because the gigantic trees growing here are representative of what much of the area looked like before it was settled.  
One of several scenic bridges within The Bicentennial Woods preserve
      Only a few trees have ever been removed from this property, which is believed to the last stand of virgin timber in Allen County. Stately oak trees, some with trunks nearing four feet in diameter, and huge sycamores dominate this hilly, heavily wooded preserve.

I'm sure this knobby tree formation is here for some interesting scientific reason.
However, my brain can only see one thing...
ShadeMaster from Genuine Tree Peeple
An amazingly textural, twisted tree
      Besides the towering oaks, hickories, sycamores, and dogwoods that surrounded me, I also took in these interesting sights...
Even the bracket fungi look like they need some rain.
Dryad's Saddle, polypore bracket fungus
The name "Dryad's Saddle" refers to tree nymphs of Greek mythology called dryads.  According to legends, dryads are small, shy wood spirits who look after the forest and keep an eye on the health of the trees.  This mushroom's shape and size make it a suitable, and probably rather comfortable, seat for a dryad. 

The Wood Nymph, 1898
by Charles Marion Russell
Chickweed
In folklore, a sprig of chickweed carried in your pocket was said to draw the attention of a
 loved one or ensure the fidelity of your mate.

A crazy, wild stand of creeping, crawling, hanging vines.

"The vine embraces the elm, and other plants cling to the vine.
So that things which have no powers of sense to perceive anything else,
 seem strongly to feel the advantages of union."
~Desiderius Erasmus, 1521


      I would enjoy a return trip to Bicentennial woods. Perhaps the fall, when the leaves are turning, would be a good time to share this little part of Indiana's natural splendor with my kids.  And who knows...maybe Sherman and Cell Phone will join us, too!

Tom and Jane Dustin Nature Preserve, Allen County

      The husband/wife nature hike continues as my special hiking companion, hubby Sherman,  accompanies me to the Tom and Jane Dustin Nature Preserve in Allen County.
http://www.acreslandtrust.org/templates/System/details.asp?id=44551&PID=697595
      If you visited my last post, you know my husband, Sherman, is my hiking companion today, and we started our hike at the Robert C. and Rosella C. Johnson preserve which is immediately adjacent to the Dustin preserve.  


A peek at Cedar Creek
      By now, we know we've crossed over into the Dustin preserve because we have reached Cedar Creek. Cedar Creek forms the southern boundry of this preserve, and is a State Scenic and Recreational River.  There are only 3 rivers in Indiana with this designation. (The others are Wildcat Creek in Tippecanoe and Carroll counties and the Blue River in Harrison, Crawford, and Washington counties.)
A perfectly sunny day.  I love how the reflections of the trees in the water
look almost as lifelike as the real things.
      As the roadside sign says, the Dustin preserve is also the home of the Acres Land Trust office. Much of this preserve, including the house which is now Acres' administrative office, was originally owned by Tom and Jane Dustin.  The Dustins were eminent conservationists who helped pass many of Indiana's most significant pieces of conservation statutes, including the Nature Preserves Act and the Natural and Scenic Rivers Act.
Ready for duty.
Visitors to many Acres Land Trust preserves will see birdhouses like this  placed in strategic locations, providing bird habitats for nesting and raising birdie families.  I found these lined up on a shelf outside the Acres Land Trust office
This little guy was the only one working today at the Acres Land Trust offices.  
      Growing outside the office building we found several species of beautiful summer flowers.  I snapped away with my camera while Sherman sat on a bench and, well, texted.

Tiger lily.  We all drive by scads of tiger lilies growing along our roadsides all summer long.
But did you know... 
Native Americans used this flower for food, and tiger lilies are still dried, boiled, baked, or roasted and added to soups and stir-fry dishes in some regions of the world.  The Chinese have used tiger lilies medicinally for over 2000 years. The roots of the lily contain antibacterial, anti-parasitical, anti-inflammatory, and diuretic properties.  In herbal medicine, a tincture made from fresh tiger lily can be used in the treatment of uterine-neuralgia, congestion, and nausea.  Other uses include treatment for heart problems, eye problems, and for symptoms of menopause.
No longer will I take this common orange ditch flower for granted!

Crown Vetch
This invasive summertime wildflower is actually an herb in the legume family.
 That means it is a relative with peas and beans.  These flowers are very attractive to
 bees and butterflies, and as it turns out, poisonous for horses. 
 
Chameleon plant, or fishwort.
 This plant is native to Japan, Korea, southern China and southeast Asia.  One of the traditional asian terms for this plant is yúxīng cǎo which literally translates to "fishy-smell herb."
I guess we now know why it is also called "fishwort."

      After threatening to steal Sherman's cell phone away and toss it into the nearby Cedar Creek, he finally agreed to put it away for a while.  Long enough to hike back to the car, anyway. And it's a good thing, for if he hadn't stowed it away how could he have found these enormous, century-old trees? Trees that were no doubt here during the occupation of his own Native American ancestors.  Read more about tree growth, age, and how they've joined together here.


It's official!  Sherman is a tree-hugger!
      And how could we have witnessed this quintessential summertime vista together?  Dancing leaves silhouetted against an azure blue sky as perfectly white puffy clouds float by. I prefer this view over a text message any day!


"That beautiful season the Summer!
Filled was the air with a dreamy and magical light;
And the landscape lay as if new created
in all the freshness of childhood."
-  Henry Wadsworth Longfellow


      We should all lay down our cell phones once in a while, and enjoy the natural splendor that surrounds us, wherever we are!  See you next time!